
BAF 101- How Create an eBay Listing That Sells!
Although I have my gripes with the way eBay does business, that doesn’t take away from the fact that it’s a great way to earn money. I’m a Power Seller and make thousands of dollars every year by selling on eBay in my free time. It’s actually more of a hobby for me than a full fledged business venture. In this class, I’m going to show you how to put together an eBay listing that sells. The topics I’m going to cover will be:
- What listing options to select
- How to write a good Title
- Writing your description
- Pictures
- How to get your listing to rank higher in the search results
I’ll warn you in advance, this is a long post but it’s packed with great info and plenty of pics so pay attention!
Step 1- Creating your listing
At the top of the eBay screen, you’re going to click “sell”. You’ll be taken to a screen that looks like this:
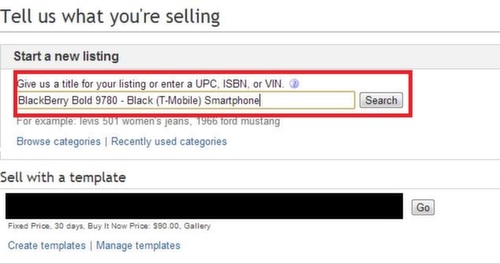
In the box, enter a description of the item you’re selling. For this demonstration, I’m listing a Blackberry Bold 9780. EBay will auto-populate the search box as you type if they find a product that matches yours in their catalog. If nothing comes up when you’re searching for the item you’re selling, don’t worry. Just describe what your product as best as you can. You’ll be able to edit your title later. Click “search”.
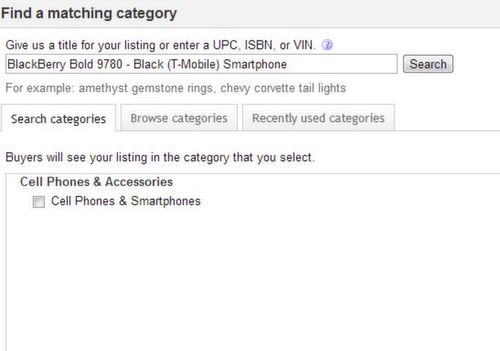
Step 2- Choosing a category
It’s very important that you list your product in the right category. When people are searching eBay, they usually narrow the listings by the categories. EBay will try to find the category that best matches your item. For my demo listing, the search yielded this category recommendation:
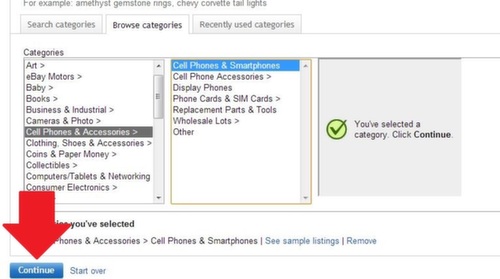
In my experience eBay is pretty good about recommending a category to list your product in. If the category they recommend is incorrect, you can manually choose a category and subcategory by clicking “Browse categories”.
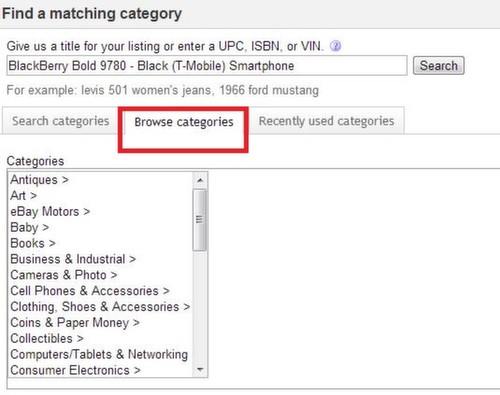
Try to be as accurate as possible when choosing a category. Once you’ve chosen a category, click “Continue”.
Step 3- Confirm correct product
If eBay found a product in their database that matches what you’re selling, you’ll see a screen that looks like this:
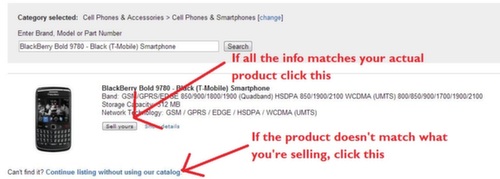
This is pretty common if you’re selling electronics, shoes, or other popular items that get listed repeatedly. If the product matches (make sure it’s the EXACT SAME PRODUCT) then you can click on “Sell yours”. If it’s no the same product, click on “Continue listing without using our catalog”.
This is very important because if you click on “Sell Yours” and your product is actually something different, the incorrect product details from eBay’s catalog will show up. Then you’re opening yourself up to receive an “Item not as described” claim once you sell it. Since my product matches, I’ll click “Sell yours”.
Step 4- Complete your title
The next screen is where you put your listing together. If your product matched a product in eBay’s catalog, you should notice that the “Product Details” section has been auto-generated. Make sure the box that says “Include the following product information in your listing” is checked.
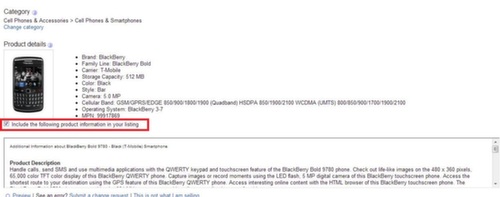
The first thing I do at this screen is complete my title. As you can see, eBay will auto-generate a title for you. I go in and add some extra info. For the BB listing, I just added in a few extra words.
![]()
Make sure to include any keywords that someone searching for your item might use to find it. Brands, models, distinct characteristics (i.e antique), and anything else you can think of. This is important for helping your items rank higher in the eBay search results for as many keywords as possible. If you need help thinking of a title, search eBay’s completed listings for items like yours that have sold and you can actually copy/paste it if you want.
Now, I’m just going to go over each option in the listing section step by step.
Subtitle
Adding a subtitle to your listing is extra. I NEVER PAY FOR ANY EXTRAS for my listings. If you have a good title, description, and pics, you don’t need to pay for any extras.
Condition
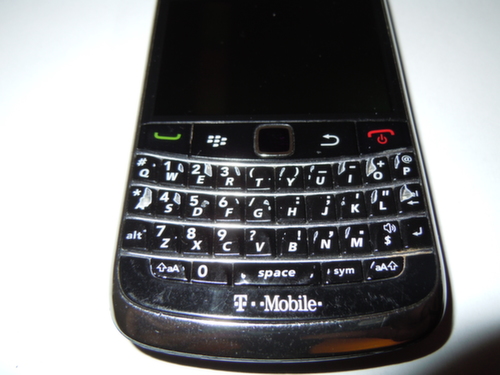
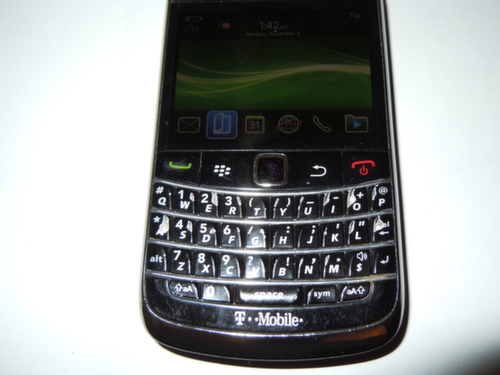
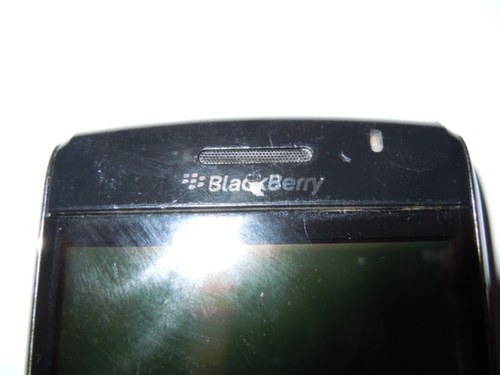
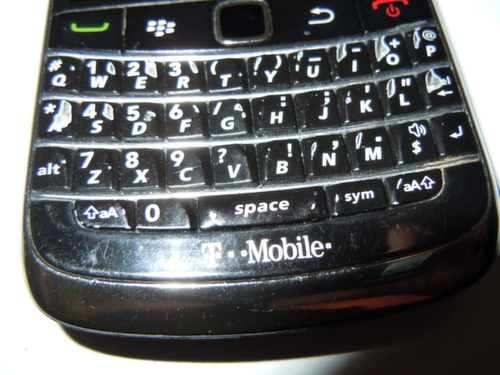
If you choose any condition other than “New”, you will have to enter a “Condition description”. In our demo, I’m selling a used Blackberry Bold. It has nicks and scratches on it so I have to note that in the description to avoid “item not as described” claims. If there are any big issues or problems with your item, make sure you note them here.
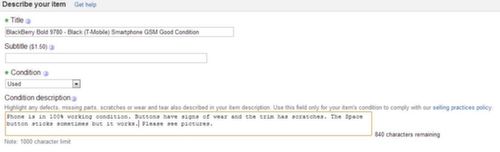
In case you can’t see the picture (I didn’t realize how small it would when I resized it) it says “Phone is in 100% working condition. Buttons have signs of wear and the trim has scratches. The Space button sticks sometimes but it works. Please see pictures.” I always advise buyers to look at the pictures so they know exactly what they’re getting.
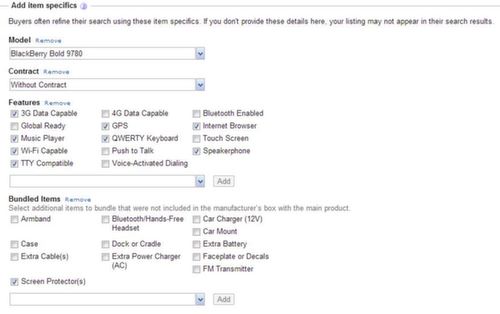
Add item specifics
The way that this section looks will differ depending on what you’re selling. Most of them all have an option to choose a brand, manufacturer, UPC number, etc. Enter as much information as you can here. It will help your listing rank higher for searchers.
Photos
Pictures can make or break your eBay listing. Taking bad pictures will get your listing less views and will hurt the chances of anyone buying from you. You’ll notice that a lot of eBay sellers tend to not list images of the actual item being sold and just post a stock image. I discourage this unless your item is brand new. Even then, I still list images of the actual product I’ll be shipping. You can use a stock image for the picture that appears in the listing if you want (I do this a lot), but always include pics of the actual item within the listing.
As for taking pictures, a lot of people recommend using a DSLR camera. I use a Nikon Coolpix S8000
and would definitely recommend it. It’s not too pricey and has great quality. I’m not a photographer by any means but my listings consistently sell for top dollar so I assume my pictures are pretty decent.
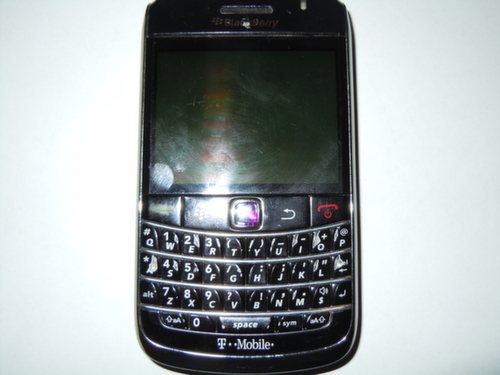
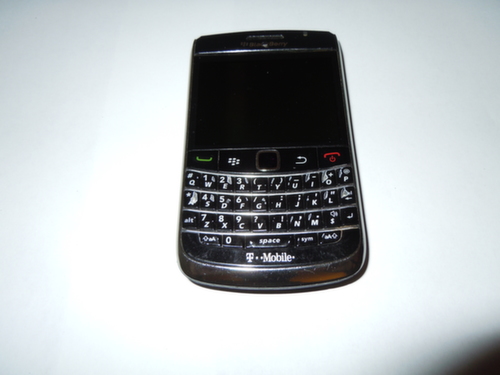
When you take your pictures, try to capture any blemishes, scratches, or important features (engravings, artwork, etc). You can upload up to 12 pictures for free so do as many as you need. Here are the pictures I took of the BB when I originally sold it in December.


There is an option in this section to pay $1.00 for Gallery Plus. Like I said, I skip any additional paid features because I don’t think they’re worth it.
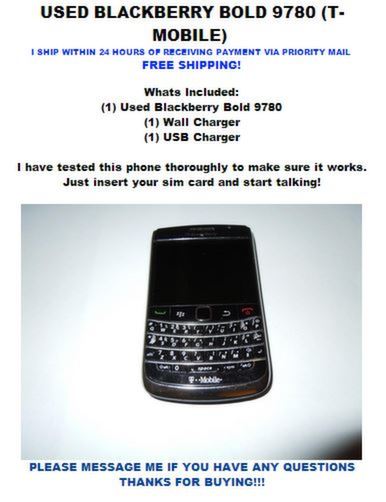
Description
It’s time to do some copywriting! You don’t have to be an expert writer in order to write up a good description. A lot of people only put a couple of sentences. I wish I could show you the exact description I used when I originally sold the phone but it was too long ago.
Here are some of my tips for your description:
- Keep it simple
- Don’t use a bunch of different fonts and colors
- Center align it
- Embed pictures
- Embed a video for an extra boost (optional)
Here’s an example of a listing I would do for the BB. The only difference is I would include more pictures. I would include all of the pictures I uploaded in the step earlier plus any others. By embedding your pictures, you can include as many as you want. Don’t worry, I’ll show you how to do it.
In order to embed pictures into your listing’s description, you will have to upload them to a site and then use HTML coding to embed it into your description. I use Photo Bucket to upload my pics. They will give you the HTML code so you can just copy and paste it. Here’s the entire process for embedding pictures into your eBay listing.1. Create a folder on your computer with all the pictures of your product. Rename all the photos to match your listing’s title. For example, I would rename all of my images to “BlackBerry Bold 9780 – Black (T-Mobile) Smartphone GSM Good Condition”. The reason we do this is so that our keywords are in the code when we embed the pictures in the listing. It helps with SEO. Here’s a shortcut if you have a lot of pictures. In the folder where all your pics are saved, press CTRL+A to select all photos. Then press F2 and type the new file name and press enter. This will change the name of all the pics in the folder.

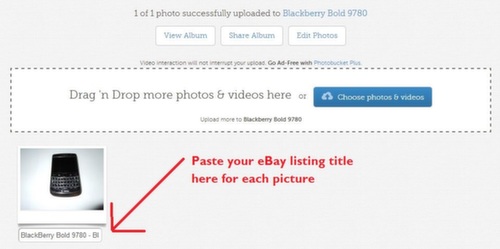
2. In Photo Bucket, create a new album to upload all of your pictures to. This helps you stay organized. Name the album after the product. For our demo, I would create the album “Blackberry Bold 9780”. Upload all of your images to this album. With Photo Bucket you can just drag and drop all the images at the same time. Once all the pics are added, you’ll have the option to add a Title. Paste the title of your listing in the listing for each image. Again, this helps with SEO when you embed the code into your listing.
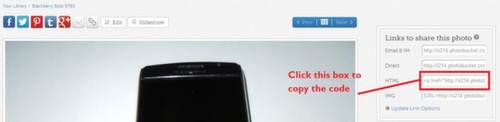
3. Next you’re going to get the HTML embed code from Photo Bucket. You can click on each individual picture to be taken to a page that has the HTML embed code (like in the picture below) or in the Gallery view you can hover over each thumbnail and click on the link that says “Get Links”.
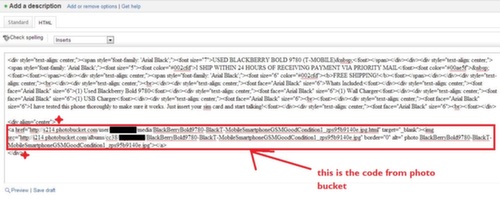
4. To paste the code into your eBay listing, you’re going to have to click on the HTML tab under “Add a description” instead of the Standard view. Don’t worry about all of the code that you see. At the bottom of it all, paste HTML code you copied from Photo Bucket.
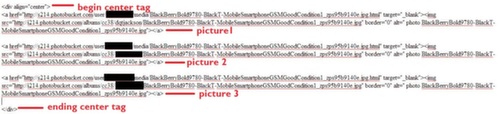
Notice the tags I placed around the embed code that says < div align=”center” >. What this does is center your images. Place all the embed codes for your images in between these codes. So if you had multiple pics, it would look like this:
That’s all there is to it. for adding pics. Another cool thing you can do is embed videos. A lot of people don’t know that you can do this or don’t know how. But it’s actually really easy. Here’s how to embed videos into your eBay listing.
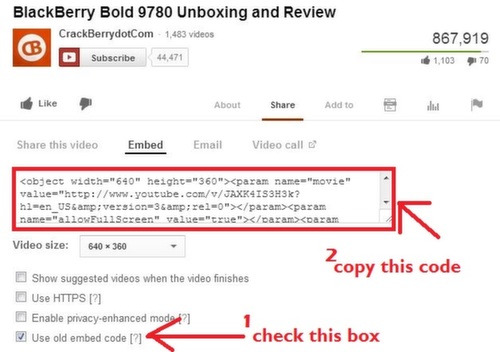
to record the video. Then upload it to YouTube. If you’re selling a brand new product, you can upload a video of a product review by you or someone else.2- Once you’ve recorded your video, get the embed code from YouTube. This is the step that most people mess up on. EBay doesn’t allow iframes in listings. I don’t remember when it happened but at some point YouTube switched their embed codes to iframes. To get around this, you have to check the box that says “use old embed code”.
 Copy the code, then paste it into your description editor just like you did with the pics including the div center tags.
Listing designer
It costs money, so you already know what I’m going to tell you. Skip it! If you want a design, you can invest in an account at Auctiva. They have a bunch of templates you can use. There’s a monthly fee to use them. If you’re listing a bunch of items every month it might be worth it. The pricing starts at $2.95 but you’ll probably need at least the $9.95 plan because the $2.95 plan only includes 15 listings. Tons of sellers use them and they’re partnered with eBay so they’re 100% legitimate.
Choose a format and price
You have two options to list your product:
- Auction
- Buy it now/Fixed Price
Which method you choose is up to you. Lately, I’ve been doing all Fixed Price listings. If you’re selling very popular items like phones, video games, new shoes, or anything else that is in high demand, you can do an auction. If you’re not sure whether or not your item will sell or you have a set price that you want, you can do a fixed price.
Fixed Price
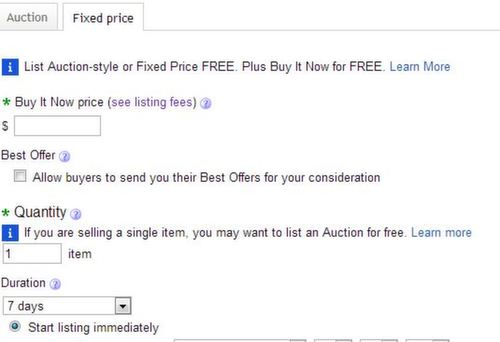
The options are pretty self explanatory. If you’re open to taking offers, you can check the box for “Best offer”. This will allow buyers to submit offers to you. You’re not required to accept any offers.
As for the duration, I list for 30 days. If it’s a product that you’re going to be selling indefinitely (you have to have a lot of it in stock) you can list it as “Good till canceled”. I have one item I’ve been selling for a while that’s set for this. The nice thing about “Good till canceled” is that you don’t have to keep going back to re-list the product every 30 days and the quantity you sell doesn’t get reset. I always start listings immediately.
Auctions
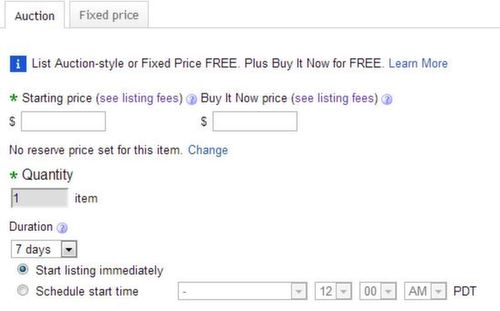
Auctions are what eBay was built on. If you’re going to list as an auction here are my suggestions.
- Set the starting price at $0.99
- Start listings Sunday evenings (~7-9PM EST) and run for 7 days
- If the item is popular, don’t set a reserve price
Auctions with no reserve price get more views than the ones with reserves. When no reserve is set people feel like there’s a possibility of getting a good deal. But I understand some sellers are a little hesitant and don’t want their items to go for too cheap. When a reserve is set, you don’t have to sell your item if your reserve price isn’t met. Without a reserve, the price your auction ends at is what it sells for.
eBay Giving Works
This section lets you do something nice and donate a percentage of your sale to a charitable organization. In exchange, eBay will credit part of your fees back to you if your item sells. There’s more info on the Giving Works program here.
Select how you’ll be paid
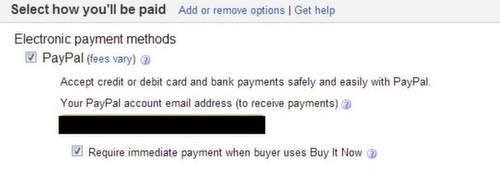
These are the options I have checked all the time. Always accept PayPal and always require buyers to pay immediately if they do buy it now. Unfortunately if you do an auction, the winner isn’t required to pay immediately.
Add shipping details
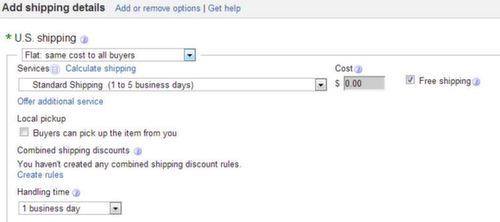
I offer free shipping on all my listings. If you’re doing Fixed priced listings there is no reason to charge shipping because you have to pay fees on the total anyways. Just work the cost of shipping into your selling price. Listings with free shipping tend to end up higher in the search results and people love to see that free shipping icon.
I don’t allow local pickup and I always set my handling time for 1 day. Never set your handling time for longer than 2 business days. Long handling times discourage buyers.
I don’t do international shipping so I really can’t give any tips or advice here. EBay recently launched their Global Shipping Program and I’ve heard really good things about it. It’s definitely something to consider.
Package Details
I don’t use any of these. You can exclude certain shipping locations but since I already exclude buyers from other countries I don’t bother with this option.
Add other details
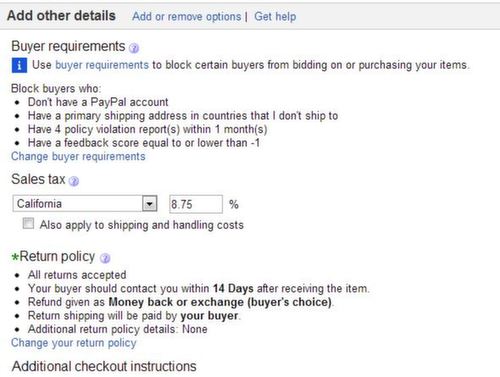
The buyer requirements are important. They restrict buyers who don’t meet your criteria from bidding or buying your products. The settings in the picture above are exactly what I use for all my listings. I restricted Alaska, Hawaii, PR, and every country outside of the U.S. You can customize your settings however you want or just copy mine. With these settings, I’ve never had any major issues with buyers.
I charge California state tax because it was already set that way. It might be a lazy reason but it’s the truth. I started offering returns when I became a TRS. Before that, I never offered returns. I thoroughly test and examine everything I sell so I know it works before i ship it out. If you’re confident in what you’re selling and follow all the tips I gave you about your description, you shouldn’t need to do returns. Obviously listings with a return policy will be more attractive to buyers but it’s up to you whether or not you want to accept returns.
Be forewarned that if a buyer has an issue with the product, your best recourse is to give them a refund because they’re going to get their money back regardless through PayPal or their credit card company.
Once you’ve finished with all of these options, click “continue”.
Reviewing your listing
You’ll come to the Review your listing/upsell screen. You already know what I’m going to tell you about the add-ons. A lot of sellers get tempted by the BOLD title for $2.00 but you do not need it no matter how eye catching eBay tells you it is.
When you scroll down a little bit, you’ll be able to see what your listing will look like in the search results page. Make sure spelling and everything is correct.

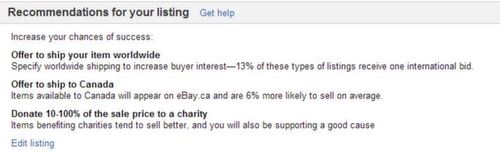
EBay will also give you some recommendations on how to improve your listing. I skip right over these suggestions.
Below that you’ll be able to see a breakdown of your fees. If you were wise and followed my advice, you shouldn’t have to pay any type of listing fees.
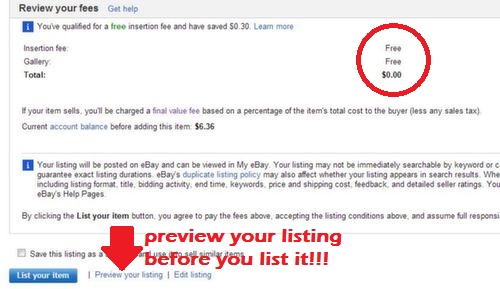
I always use the “Preview your listing” link to do one last check. If everything looks ok, click the “List your item” button and you’re set to go!
You have everything you need to start listing stuff up on eBay. Your homework for this class is to find something around your house and put it up on eBay. Check back for more eBay tips. This is officially the longest blog post I’ve ever written!


