How To Create and Build An Email List
EMAIL MARKETING 101
 The Power Is In The List! You’ve heard this phrase over and over in the Internet Marketing world. Rather than just give you a generic spiel about why you should be creating an email list, I’m going to show you how to create a newsletter or email list. I’m still going to go over the why part, but I also think it’s extremely important that I show you how to get started so you’re not lost in the dark.
This should function as a good guide for people completely new to list building, and experienced people might pick up a few tips as well. I thought about making a free eBook on this topic, but decided to just make a quick blog post on it.
Honesty Is The Best Policy: This post contains affiliate links for the services that I personally recommend. If you use my affiliate link to sign up for any of the recommended services, I will receive a commission. I only recommend products/services that I personally use!
What is Email Marketing?
I don’t really like the term email marketing, because it implies that every email you send to your list should be an attempt to market and advertise something. And that’s really not what you should be doing if you want to be successful.
But email marketing is basically sending out emails to a list of subscribers who signed up to receive messages from you. The subscribers can come from a variety of sources (which I’ll go over later). In the past, a lot of marketers basically used this just as a method to spam the crap out of their subscribers and hope that someone bought what they were selling. If you check your SPAM folder, you’re probably aware that a lot of that still goes on today. But thankfully, there has been a huge movement towards blending email marketing with inbound marketing.
What I mean by this is that a lot of internet marketers are choosing to send more informative emails to subscribers and free gifts instead of simply trying to sell them on something. This is what the basis of this post will be about because I believe that’s how email marketing and list building should be used.
Once you start doing it, you’ll figure out that it’s really simple. There are some complexities involved when it comes to tracking and split testing, but it’s really easy to get started.
Why You Should Have A List
No matter what method you’re using to make money online, building a list is extremely beneficial. Retail stores, affiliate sites, subscription services, and even CPA can all use list building.
There are so many benefits of email marketing:
- Build and grow relationships
- Be able to reach your readers any time
- You have 100% ownership of your list (Facebook and Twitter can go away anytime)
- People who subscribe do it voluntarily so you know they’re interested in your niche
- Great way to build traffic and promote your blog
- It’s extremely cheap to setup
- It can be automated- Huge Time Saver!
- Allows for personalized communication
- Segmentation
- Emails can be shared easily by your readers
- Easy to track- you can track open rates, clicks, and the complete sales funnel
- Nearly everyone has an email address
Also, consider this scenario:
Marry is starting to learn how to crochet. So she starts Googling different terms like “how to crochet” or “crochet tips for beginners”. She goes through a bunch of different blogs gathering information. Out of the 10 blogs she visits, one of them has a free eBook called “100 Crochet Tips For Newbies”. So she fills in her email and gets the free eBook.
Which of the 10 blogs do you think is in the best position to keep Marry as a long time reader, and potentially even make money from her through affiliate sales? In a nutshell, that’s why you need to start building an email list.
If you ask nearly any successful internet marketer or blogger what their biggest regret is, or what they would do differently if they could start over, a majority of them will say they should have started an email list from the get-go. And guess what, they’re usually right.
But by now, I probably don’t have to convince you anymore. Email Marketing is a necessity for internet marketers today.
TIP! Start building your list as soon as your site launches. You could even do a pre-launch and start collecting emails in a “Coming Soon” page. Email subscribers also spend spend 138% more than non-subscribers. Waiting to build a list is like throwing money away.
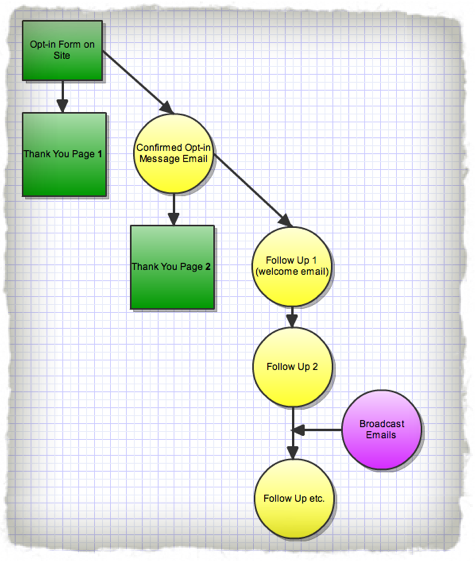
Here’a quick diagram that will show you the process of email marketing works courtesy of Patt Flynn from Smart Passive Income. If you’ve ever subscribed to an email list before, then you’re probably familiar with this process. I’ll go into more details throughout this post:
Now I’ll show you how to do it like a BOSS!
HOW TO CREATE YOUR LIST
Step 1: Choose an Autoresponder Service
In order to actually build your list and send out your emails, you need to sign up with an autoresponder service. I’ve heard of people trying to use regular email clients like GMail or Hotmail to run an email marketing campaign (I actually signed up to one and to this date have been unable to unsubscribe from it). Using a regular email service to save a few bucks isn’t a good idea.
Autoresponder services allow for:
- Complete automation
- More organization
- Tracking
- A bunch of other benefits you can’t get from your regular email service
So in short, use a legit autoresponder service for email marketing.
So the next question would be, which autoresponder service should you use? There are plenty of options out there:
- Mailchimp
- Aweber
- Constant Contact
- Get Response
- iContact
- North Contact
I’ve primarily used 3 services; Mailchimp, Aweber, and North Contact. My personal recommendation is Aweber. They are more “internet marketer” friendly, extremely easy to use, and I haven’t had any issues at all with them. Their customer service is also kicks ass. They actually go as far as sending out a thank you postcard in the mail after you sign up.
Try AWeber’s Autoresponders for $1
Ok, so once you’ve signed up for an account, the next step will be to set up your first list. If you chose Aweber or Mailchimp, you can run email marketing for all of your websites with just one account. Most other services are like that too, but I can’t speak for all of them.
Step 2: Create your first list
Aweber and Mailchimp both do a great job of walking you through the process of setting up your list. They will guide you through the entire process upon logging into your account for the first time. Here’s Aweber’s Tutorial, and here’s Mailchimp’s guide.
A pretty common question that I see a lot on different forums is what do put for the address section. The CAN-SPAM Act requires you to include an address in the emails you send out for email marketing. There are some people who don’t do it, but it’s best practices to do so, and Aweber and Mailchimp will require you to.
The good thing is that you don’t have to use your home address. I don’t know about you all, but I don’t want a bunch of strangers knowing where I live. So what you can do instead is use a P.O box or a virtual address. Depending on where you live, this is pretty cheap. I got my P.O box for 12 months for about $35. If you don’t plan on actually receiving mail, go for the smallest size.
Step 3: Create a Confirmed Opt-In Email
A confirmed opt-in email is just an email that gets sent asking your subscriber to confirm their subscription. It gets sent out as soon as someone enters their email into an opt-in form (discussed later). In the opt-in email, there’s a link that the subscriber has to click on in order to confirm their subscription. If they don’t click on that link, they won’t be added to your list.
Now, confirming opt-ins technically isn’t required. However, it is HIGHLY recommended. As Aweber states on their website:
All subscribe methods require Confirmed Opt-In to ensure only recipients who have specifically requested to be on the list are subscribed. This means you have proof someone opted-in, fewer unsubscribe requests and far fewer spam complaints.
Your autoresponder service will have a pre-written message for you to send, but you can edit it and customize it to say whatever you want. Don’t go overboard with this message. Keep it short and sweet. You just want them to click on the confirm link.
Another great benefit of Aweber that I haven’t seen in other services is the ability to set up a Thank You page after someone enters their emails initially that has a video that reminds them to check their email to confirm their subscription. More info on that here.
The key takeaway from this step is to make sure that you set confirmed opt-ins for your lists.
TIP! Aweber did a case study to test the effectiveness of confirmed opt-ins vs non confirmed ones. They got the following results:
Confirmed
- Unsubcribed: 7.9%
- Moved messages to spam: 1.4%
Non-Confirmed
- Unsubscribed: 22.2%
- Moved messages to spam: 2.1%
Step 4: Success Page
After the subscriber has clicked the Confirm Opt-in link, they’ll be taken to a Success Page. You have a few different options for what you put on your success page. You can even just have it go to a generic Success Page created by your autoresponder service. Here’s some ideas of things you can do with your success page:
- A personalized “thank you for subscribing” message
- A thank you with all of your contacts-Twitter, Facebook page, Pinterest, email, etc.
- Remind them to add you to their white list so that your emails don’t end up in the SPAM folder (this can definitely happen)
- Promote one of your products (upsell or one time offer) or an affiliate product- this is very popular in the “make money online” niche
- If you’re giving away a digital product to collect emails, include the download link on this page (more on this later)
- A helpful article exclusively for your email subscribers
Step 5: Setup your automated messages/follow up Message Series
There are two ways to send emails to your list:
- An automated series of pre-written messages triggered by actions or dates
- One time messages sent to all current subscribers simultaneously
In this section, I’m going to talk about the first type. One of the main features and reasons people use autoresponder services is to setup follow up series, which automates their email marketing efforts. One of the biggest mistakes I’ve made with email marketing is not realizing the importance of setting up the follow up emails prior to getting subscribers.
With a follow up series, you can pre-write out as many messages as you want, and have them sent over X amount of days. Let’s say for example I had a follow up series of 4 emails. Using my autoresponder service, I could have those emails sent out over the course of 4 weeks automatically (once every 7 days). They would start sending out based on the date the person subscribed to my list.
The first email in your series should be a “welcome email”. It should tell them what to expect from your future emails, and you can give some extra information depending on your niche. For example, I might send out a welcome email and include 5 tips for selling on eBay.
It’s a good idea to load up about 10+ emails for your series, prior to gathering subscribers. That way, you have a consistent flow of emails being sent out and you can focus on just getting subscribers.
You should also use this as an opportunity to play around with the message creator.
TIP! Don’t go overboard with the styling of your messages! 47% of email is opened on a mobile device. So a lot of your styling and fancy formatting won’t look so great when your subscriber reads it. Limit styling to bold and italics. If you have a bunch of images and video, write a summary of what you want to tell the subscriber, and include a link to your blog for the full post.
Step 6: Creating an opt-in form
Most autoresponders will allow you to create a subscribe form from the User Panel. However, I’ve never been a huge fan of the options they give you. They tend to look a little dated and, how should I put this, unappealing to me. Unless you’re good with coding, making them look better is pretty difficult.
Instead, I use and highly recommend the Optin Skin plugin. I have been using it for years on all of my sites and it’s been one of the best investments I’ve made in internet marketing. The forms actually look like something I’m not embarrassed to put on my site. Also, it works with all of the major autoresponder services like Aweber, Mailchimp, Constant Contact, and others.
Here’s an example of one of the opt-in forms I created with Optin Skin to giveaway my free eBay Feedback Cards. Feel free to sign up if you’d like.

The important thing to remember with opt-in forms is not to put too much text on them. A nice headline and call to action is all you really need. The less information you collect, the higher chance you’ll have of having someone fill out the form. Think of it from their point of view. Would you rather just enter your email or have to fill out a complete questionnaire?
The only thing you really need is their email address. Getting a name is nice because it will allow you to customize the emails you send them which can increase the open rate of your emails. But it’s really not a necessity.
Once you’ve gotten to this point, you’re pretty much ready to start gathering emails. What I recommend doing is testing the entire subscription process out. Fill out your opt-in form as if you were a subscriber, and make sure everything is working. Some things to look out for are:
- Emails getting sent to your SPAM folder
- Typos
- Follow up messages not sending or sending in the wrong order
- Links in your emails not working
That pretty much covers the email list creation portion. Next, I’ll talk about how you can actually market and build your list.
HOW TO BUILD YOUR LIST
Most people are not willing to just give their email out for no reason. A lot of people assume that when they enter their email address somewhere online that they’re opening the door to get spammed to death. In some cases, that’s actually true. There are people who gather email addresses for the sole purpose of selling them to marketers.
Understandably, this has made people a little more wary about who they give their email address to. So over the years, internet marketers have had to get a little more creative with how they collect emails. One of the most popular methods for building email lists is to give away a free product.
Step 1: Create something to give away
The first thing you’ll want to do is create something that you can give away. The beauty of the internet is that you can give away digital products, instead of physical goods that have to be purchased and shipped and costs a lot of money.
The most popular thing to give away is an eBook. I’ve done this in the past and still do it today. They are fairly easy to create, and the only resource you need to create one is time. The content inside of the book will depend on your website or niche. If you had a financial related blog, you could write a “15 Financial Tips That Will Make You Rich” book. If you were in the sports rehab niche, you could write a “These 12 Mistakes Could End your Sports Career”.
As for actually writing the eBook, you have a few options:
- Write it yourself: If you don’t mind writing, this is a great option. I’ve written free eBooks to give away in less than a day.
- Pay someone to write it for you: You can use a site like oDesk, ELance, Textbroker, or even Warriors For Hire to get a free eBook written up. With this option, keep in mind that you’ll get what you pay for.
- Use PLR: This is something I’ve been doing a lot more of recently. PLR stands for Private Label Rights. It’s content (ebooks, articles, reports, software, etc.) that you can reuse and reclaim as your own depending on the terms. Do a Google search for “your niche PLR” where “your niche” is replaced with whatever your niche is.
TIP! When using PLR, I have gotten much better results with paid PLR than I have with free stuff. My Go-To site for PLR is PLR Mini Mart by Tiffany Lambert. It’s one of the few PLR market places with eBooks and articles written by an actual native English speaker. Tiffany was actually a freelance writer for years so she’s 100% legit. With any PLR, you should edit some of the content to gear it towards your specific audience.
You don’t have to limit yourself to just eBooks. You’ll notice that I’m giving away free eBay Feedback Card templates to build my list for this site. That’s because a lot of people that visit my site are interested in selling on eBay and because it pairs nice with the eBay Product Sourcing Guide I sell. So get creative and think of something that your audience could benefit from.
You’ll integrate whatever you’re giving away with your opt-in form like I did above in the section about Optin Skin.
Step 2: Push traffic to your free product
 After you have your eBook or other free product created, you’ll have to tell people about it. This is the part that most marketers struggle with, especially when they’re just starting out. I’ll give you a few different methods that you can use to push traffic to your opt-in form and start getting some subscribers.
Include your form on your site
You can put an opt-in form:
- On your side bar
- At the end of posts
- Within posts
- On your home page
- On a dedicated page
You don’t have to put one everywhere. Typically one on your sidebar and one at the end of your post is good enough. However, I do recommend adding a dedicated page on your site for your free product that has an opt-in form on it. It will function like a landing page pretty much.
A lot of people prefer to use Optimizepress for this because it can make your landing pages look a lot more professional. I plan on giving it a try, but just haven’t gotten around to buying it yet. But it’s one of the most popular WordPress plugins out there, especially for internet marketers.
I just got an awesome plugin that I’m going to be implementing on all of my sites soon called Q2W3 Fixed Widget. It’s a free plugin that enables the widgets on your sidebar to float fixed as people scroll down your site. You can actually see it in action right now on my sidebar. As you scroll down, the Website Toolbelt widget scrolls down with you.
You can use it to help the opt-in form on your sidebar stand out more. I’m going to be testing it out over the next few months to see how effective it is.
As your site builds more traffic through SEO, social media, guest posting, etc. the opt-in forms on your site will become a lot more valuable.
Guest Posting
Most people look at guest posting just as on opportunity to get backlinks. However, instead of thinking in terms of SEO, you can actually use guest posting as an opportunity to build your list. This is exactly what Daniel DiPiazza did with his guest post on Under30CEO.com. He could have easily just used the opportunity to get a backlink, but instead, he used it to build his list.
What he did was create a landing page specifically for the Under30CEO guest post. The post blew up, and I’m sure he got a ton of subscribers as a result. Now if he just would have added a backlink to his site’s home page, think of all of the subscribers he would have missed out on.
Some blogs might not be willing to let you link to a landing page. But if you do what Daniel did and customize the page specifically for the blog or offer something special for the site’s readers, they will be a lot more likely to let you do it.
Paid Advertising
If you have some money to spend, you could always invest in paid advertising. Direct your ads to a landing page with your email subscribe form. I’ve done this using Facebook’s advertising and got some fairly good results. Facebook ads are a good way to get your feet wet with PPC advertising because it’s a lot cheaper than other platforms like Google AdWords.
With paid advertising, you should expect to spend a good deal of money until you’re able to optimize your ads. I’ll probably do a write up on optimizing ads at some point.
You could also buy ads on other sites, i.e media buying. Since this isn’t something that I have a lot of experience with, I can’t give you too much insight. But plenty of people do it very successfully.
There are also plenty of other options like social media, YouTube, podcasts, etc. You should be promoting your list on every platform possible.
Conclusion
Building an email list requires a lot of testing to see what gives you the best results. If you’re not getting any opt-ins on your site, then try changing up your copywriting or design of your opt-in form. There are a lot of variables that play a role in how well your form performs.
Take the first step by signing up for an autoresponder account and creating your first list. With internet marketing and making money online, I’ve found that the best way to learn is to take action. Hopefully this LONG post will help guide you along the way. Feel free to leave any questions in the comments below.
Thanks for reading. A list of all of the resources mentioned in this post is below because I know it’s a pain to have to scroll through a post this long to find what you were looking for :).
Resources
- Autoresponder Service: Aweber
- Opt-in Form Creator: Optin Skin
- PLR products to give away: PLR Mini Mart
- Landing Page Plugin: Optimizepress
- Sticky Widget Plugin: Q2W3 Fixed Widget




Great article for getting started with an email marketing service! I have a basic service now with my travel blog unevensidewalks.com, and am looking to upgrade and get on the bandwagon. People say Mailchimp has cooler templates, but Aweber scales better, so I need to decide on one or the other.
I used Aweber, it does the trick for what I use it for. There are plenty of great tools you can integrate with either Mailchimp or Aweber that make optin boxes easier. Good luck whatever you decide.